----------------------------------------------------------------------------------------------------------------------------------------------------------
http://www.forestgfx.com/tutorial/full-browser-flash/
------------------------------------------------------------------------------------------------------------------------------------------------------------------
1 OPEN THE STARTER FILE
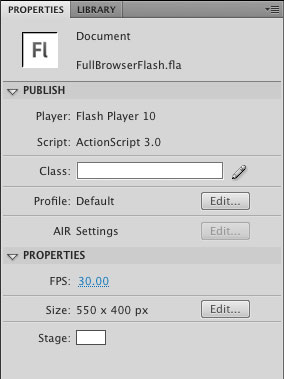
Download the exercise file for this tutorial at www.layersmagazine.com and unzip it onto your desktop or other location of your choosing. Inside of the ZIP file you’ll find a file named “FullBrowserFlash.fla.” Open this file in Flash CS4. This movie is set to publish to Flash Player 10 and uses ActionScript 3. It’s important to keep this last setting, as the code I’m about to show you will only work when targeting ActionScript 3. In the Library panel (Window>Library) you’ll see a couple of imported BMP files. These will be used to create a tiling background for the site.
Download the exercise file for this tutorial at www.layersmagazine.com and unzip it onto your desktop or other location of your choosing. Inside of the ZIP file you’ll find a file named “FullBrowserFlash.fla.” Open this file in Flash CS4. This movie is set to publish to Flash Player 10 and uses ActionScript 3. It’s important to keep this last setting, as the code I’m about to show you will only work when targeting ActionScript 3. In the Library panel (Window>Library) you’ll see a couple of imported BMP files. These will be used to create a tiling background for the site.
2 CREATE SOME LAYERS
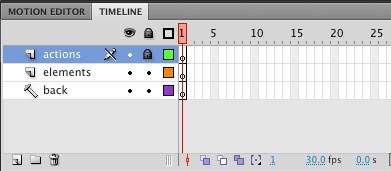
One of the images in the Library panel, named “placeholder,” will be used only during authoring so we can preview how things will look against the background. In the Timeline, double-click the first layer’s name and rename it “back,” then Right-click on it and choose Guide. (Note: A guide layer is only visible while authoring and doesn’t get exported with the movie.) Click the New Layer icon at the bottom of the Timeline panel and rename the layer “elements.” Create another layer and rename it “actions.” Click in the lock column for this layer; we’ll use it to hold our ActionScript.
One of the images in the Library panel, named “placeholder,” will be used only during authoring so we can preview how things will look against the background. In the Timeline, double-click the first layer’s name and rename it “back,” then Right-click on it and choose Guide. (Note: A guide layer is only visible while authoring and doesn’t get exported with the movie.) Click the New Layer icon at the bottom of the Timeline panel and rename the layer “elements.” Create another layer and rename it “actions.” Click in the lock column for this layer; we’ll use it to hold our ActionScript.
3 SET UP THE BACKGROUND
With the first keyframe of the back layer selected, drag out a copy of the placeholder image from the Library panel to the Stage and position it at x:0, y:0 in the Property inspector (Window>Properties). We’ll use this just so we can see how our page elements look on the background as we design them. Now, Right-click on the tile image in the Library panel and choose Properties. If you don’t see the Linkage section at the bottom of the Bitmap Properties dialog, click on the Advanced button. Click the Export for ActionScript checkbox and give it a Class name of “Tile.” Click OK.
With the first keyframe of the back layer selected, drag out a copy of the placeholder image from the Library panel to the Stage and position it at x:0, y:0 in the Property inspector (Window>Properties). We’ll use this just so we can see how our page elements look on the background as we design them. Now, Right-click on the tile image in the Library panel and choose Properties. If you don’t see the Linkage section at the bottom of the Bitmap Properties dialog, click on the Advanced button. Click the Export for ActionScript checkbox and give it a Class name of “Tile.” Click OK.

4 CREATE THE BLACK BAR
Both the header and the footer will contain a black bar to serve as their backgrounds. Select the first frame of the elements layer, get the Rectangle tool (R), and drag out a rectangle. Choose the Selection tool (V), click on the rectangle, and use the following settings in the Property inspector: x:0, y:0, W:825, H:93, Stroke Color: none, and Fill Color: black. Right click on the rectangle and choose Convert to Symbol. Choose Movie Clip from the Type menu and give it a Name of “blackBar.” Click OK. Now give it an Instance Name of “headerBar” in the Property inspector.
Both the header and the footer will contain a black bar to serve as their backgrounds. Select the first frame of the elements layer, get the Rectangle tool (R), and drag out a rectangle. Choose the Selection tool (V), click on the rectangle, and use the following settings in the Property inspector: x:0, y:0, W:825, H:93, Stroke Color: none, and Fill Color: black. Right click on the rectangle and choose Convert to Symbol. Choose Movie Clip from the Type menu and give it a Name of “blackBar.” Click OK. Now give it an Instance Name of “headerBar” in the Property inspector.

5 CREATE THE TITLE TEXT
Fittingly, we’ll name this example site “Full Browser Flash.” Get the Text tool (T) and click somewhere on top of the header bar that you created in the last step. Enter the text “FULLBROWSERFLASH” in all caps with no spaces in it. With the text selected, give it the following in the Property inspector: select Static Text from the menu at the top; Family: Futura; Style: Condensed Extra Bold; and Size: 42 pt. Now select each word in the title using the Text tool and give them increasingly darker shades of gray. We chose #CCCCCC, #999999, #666666. Now position the text at x:27, y:18.
Fittingly, we’ll name this example site “Full Browser Flash.” Get the Text tool (T) and click somewhere on top of the header bar that you created in the last step. Enter the text “FULLBROWSERFLASH” in all caps with no spaces in it. With the text selected, give it the following in the Property inspector: select Static Text from the menu at the top; Family: Futura; Style: Condensed Extra Bold; and Size: 42 pt. Now select each word in the title using the Text tool and give them increasingly darker shades of gray. We chose #CCCCCC, #999999, #666666. Now position the text at x:27, y:18.

6 CREATE THE INFO BUTTON
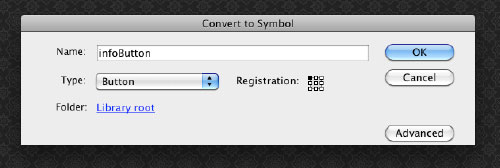
Next you’ll create a simple info button that will always be positioned at the right side of the header bar. Click somewhere off the Stage to deselect the text. Get the Text tool again and change the font Family to Webdings. Create a text field that simply contains the letter “i” you should see the info icon. Switch to the Selection tool then Right click on this text and choose Convert to Symbol. Enter “infoButton” in the Name field, choose Button from the Type menu to create a button symbol, click OK, and then give it an Instance Name of “infoButton” in the Property inspector. Now position it at x:733, y:23.
Next you’ll create a simple info button that will always be positioned at the right side of the header bar. Click somewhere off the Stage to deselect the text. Get the Text tool again and change the font Family to Webdings. Create a text field that simply contains the letter “i” you should see the info icon. Switch to the Selection tool then Right click on this text and choose Convert to Symbol. Enter “infoButton” in the Name field, choose Button from the Type menu to create a button symbol, click OK, and then give it an Instance Name of “infoButton” in the Property inspector. Now position it at x:733, y:23.

7 CREATE THE HEADER MOVIE CLIP
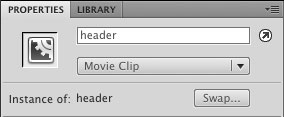
You now have the individual components of the header. All that’s left to do is to wrap them all inside of a single movie clip. With the Selection tool and Shift click the header bar, the title text, and the info button to select them all. Then, Right click on them and choose Convert to Symbol. Choose Movie Clip from the Type menu, give it a name of “header,” and click OK. Give this new clip an Instance Name of “header” in the Property inspector. Later, in the ActionScript code, we’ll dynamically resize and position the elements in this clip whenever we detect that the browser has been resized.
You now have the individual components of the header. All that’s left to do is to wrap them all inside of a single movie clip. With the Selection tool and Shift click the header bar, the title text, and the info button to select them all. Then, Right click on them and choose Convert to Symbol. Choose Movie Clip from the Type menu, give it a name of “header,” and click OK. Give this new clip an Instance Name of “header” in the Property inspector. Later, in the ActionScript code, we’ll dynamically resize and position the elements in this clip whenever we detect that the browser has been resized.
8 CREATE THE FOOTER MOVIE CLIP
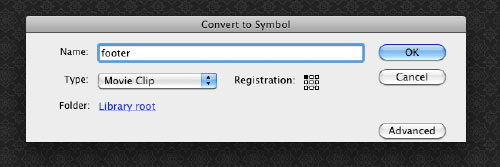
We’ll create a very simple footer for this example just so you can learn how to position things vertically when the browser resizes. Drag out a copy of the blackBar movie clip from the Library panel onto the Stage (on the elements layer), and give it an Instance Name of “footerBar” in the Property inspector. Position it at x:0 and give it a Height of 50 pixels. Don’t worry about setting the y position, as we’ll do that with code. Now Right click on the clip and choose Convert to Symbol. Choose Movie Clip, give it a name of “footer,” and click OK. Give it an Instance Name of “footer” in the Property inspector.
We’ll create a very simple footer for this example just so you can learn how to position things vertically when the browser resizes. Drag out a copy of the blackBar movie clip from the Library panel onto the Stage (on the elements layer), and give it an Instance Name of “footerBar” in the Property inspector. Position it at x:0 and give it a Height of 50 pixels. Don’t worry about setting the y position, as we’ll do that with code. Now Right click on the clip and choose Convert to Symbol. Choose Movie Clip, give it a name of “footer,” and click OK. Give it an Instance Name of “footer” in the Property inspector.
9 START WRITING SOME ACTIONSCRIPT
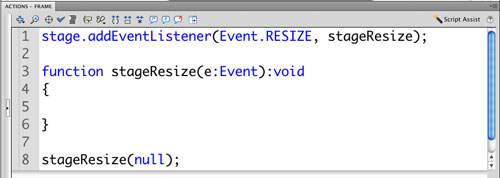
Select the first frame of the actions layer and open the Actions panel (Window>Actions). Enter the code from the image above into the Actions panel. Line 1 simply creates an event listener that will call a function named stageResize, which we’ll create in a moment, whenever a user resizes their browser window. Lines 3-6 create the skeleton for this event handler function. It’s in this function that we’ll dynamically resize and reposition elements when the browser is resized. Line 8 simply calls this function once to position things correctly when the movie first loads.
Select the first frame of the actions layer and open the Actions panel (Window>Actions). Enter the code from the image above into the Actions panel. Line 1 simply creates an event listener that will call a function named stageResize, which we’ll create in a moment, whenever a user resizes their browser window. Lines 3-6 create the skeleton for this event handler function. It’s in this function that we’ll dynamically resize and reposition elements when the browser is resized. Line 8 simply calls this function once to position things correctly when the movie first loads.
10 FIND THE NEW WIDTH AND HEIGHT
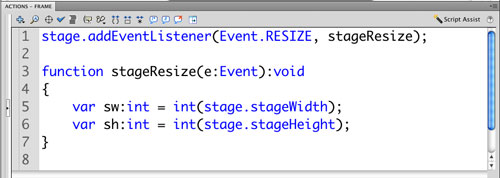
The first thing we need to do in the stageResize function is to find out the new height and width of the Stage. We’ll use these values to appropriately resize and position our elements. Lines 5 and 6 create two int variables into which we put the current values of stage.stageWidth and stage.stageHeight. Putting these values into the int data type will automatically round the numbers off, as we don’t want to position things on a subpixel level. Doing things in this fashion will also slightly help the performance of the application. Enter the code you see in the image above into the Actions panel.
The first thing we need to do in the stageResize function is to find out the new height and width of the Stage. We’ll use these values to appropriately resize and position our elements. Lines 5 and 6 create two int variables into which we put the current values of stage.stageWidth and stage.stageHeight. Putting these values into the int data type will automatically round the numbers off, as we don’t want to position things on a subpixel level. Doing things in this fashion will also slightly help the performance of the application. Enter the code you see in the image above into the Actions panel.
11 DRAW THE TILING BACKGROUND
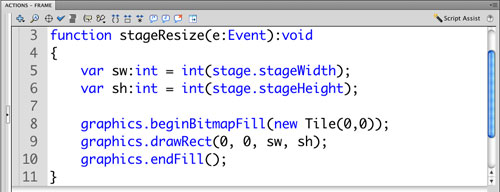
Now it’s time to draw the background for our website. Enter the code shown in the image above into the Actions panel. Anytime we want to dynamically draw in Flash we use the graphics property of the movie clip we want to draw into. Line 8 sets up our fill using the beginBitmapFill method. To it we pass in a new copy of the tile image that we have in the library. On line 9 we draw a rectangle starting at position x:0, y:0 that’s the width and height of the Stage. On line 10 we simply end the fill to finish the drawing.
Now it’s time to draw the background for our website. Enter the code shown in the image above into the Actions panel. Anytime we want to dynamically draw in Flash we use the graphics property of the movie clip we want to draw into. Line 8 sets up our fill using the beginBitmapFill method. To it we pass in a new copy of the tile image that we have in the library. On line 9 we draw a rectangle starting at position x:0, y:0 that’s the width and height of the Stage. On line 10 we simply end the fill to finish the drawing.
12 RESIZE THE BLACK BARS
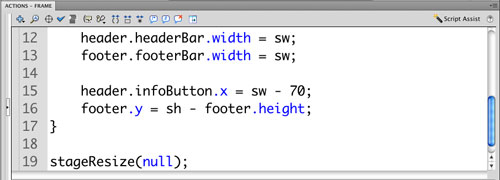
Now that the background has been drawn, it’s time to resize the black bars in the header and footer to the correct size. Enter the code shown in the image above into the Actions panel. On line 12 we set the width of the headerBar, which is inside of the header movie clip, to the width of the Stage that we calculated in Step 10. Line 13 simply does the same thing for the footerBar movie clip as well. An alternative approach for this is to simply create the bars with a very wide width so they never need to be resized.
Now that the background has been drawn, it’s time to resize the black bars in the header and footer to the correct size. Enter the code shown in the image above into the Actions panel. On line 12 we set the width of the headerBar, which is inside of the header movie clip, to the width of the Stage that we calculated in Step 10. Line 13 simply does the same thing for the footerBar movie clip as well. An alternative approach for this is to simply create the bars with a very wide width so they never need to be resized.

13 POSITION THE ELEMENTS
The last step is to position the various elements to their correct locations based on the new Stage size. Enter the code shown in the image above into the Actions panel. Line 15 repositions the info button so that it’s always 70 pixels away from the right side of the browser window. It never needs to be repositioned on the y-axis. Line 16 repositions the location of the footer movie clip so that it’s always at the bottom of the browser window. We simply set it to the height of the browser window minus the height of the footer clip.
The last step is to position the various elements to their correct locations based on the new Stage size. Enter the code shown in the image above into the Actions panel. Line 15 repositions the info button so that it’s always 70 pixels away from the right side of the browser window. It never needs to be repositioned on the y-axis. Line 16 repositions the location of the footer movie clip so that it’s always at the bottom of the browser window. We simply set it to the height of the browser window minus the height of the footer clip.
14 SETTING UP THE HTML
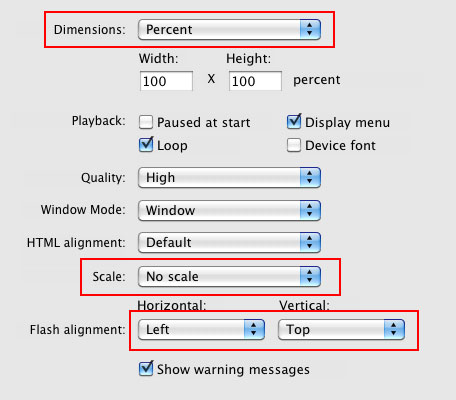
Before you can accurately test your movie you need to set some properties in the Publish Settings window. Choose File>Publish Settings, then click on the HTML tab. Choose Percent from the Dimensions pull-down menu. Now choose No Scale from the Scale menu, Left and Top from the Flash Alignment menus, and click OK. Choose File>Publish Preview>HTML to test your movie in the browser. Resize the browser to see the dynamic adjustments. You can edit the HTML file to get rid of the white borders by setting a CSS style of body {margin:0;}.
Before you can accurately test your movie you need to set some properties in the Publish Settings window. Choose File>Publish Settings, then click on the HTML tab. Choose Percent from the Dimensions pull-down menu. Now choose No Scale from the Scale menu, Left and Top from the Flash Alignment menus, and click OK. Choose File>Publish Preview>HTML to test your movie in the browser. Resize the browser to see the dynamic adjustments. You can edit the HTML file to get rid of the white borders by setting a CSS style of body {margin:0;}.
EmoticonEmoticon